
Homemade Deli Meat
Prepara un fiambre casero en casa y controla los ingredientes, puedes hacer combinaciones diferentes variando el relleno.
Homemade Deli Meat: A Healthy, Customizable Alternative to Store-Bought Cold Cuts
Say goodbye to ultra-processed deli meats and hello to homemade deli meat—a nutritious, flavorful, and easy-to-make alternative that puts you in control of your ingredients. Unlike industrial cold cuts, which often contain additives, high sodium, and only 45–55% meat, this recipe lets you craft a high-protein, low-carb dish with endless flavor combinations. Perfect for summer tapas, meal prep, or family-friendly snacks, homemade deli meat is versatile, keeps well, and is a game-changer for healthy eating. In this post, we’ll share a simple recipe, creative filling ideas, and the benefits of making your own cold cuts. Let’s get started!
Why Choose Homemade Deli Meat?
Store-bought deli meats are convenient but often packed with unwanted additives like nitrites, phosphates, and starches, as discussed in our post on 10 Common Additives in Sausages and Deli Meats.
These ultra-processed products prioritize shelf life and cost over nutrition, leaving you with less meat and more fillers. By making your own deli meat, you can:
-
Control Ingredients: Choose high-quality meats and avoid harmful additives.
-
Customize Flavors: Experiment with spices and fillings to suit your taste.
-
Reduce Sodium: Adjust salt levels for a heart-healthy option.
-
Meal Prep Made Easy: Prepare in advance, refrigerate for 4–5 days, or freeze for up to 3 months.
-
Family-Friendly: Create kid-approved snacks or meals with wholesome ingredients.
This recipe is especially great for summer, when cold cuts pair perfectly with fresh salads, gazpacho, or tapas spreads. Plus, it’s low in carbs and high in protein, making it ideal for keto, low-carb, or balanced diets.
Nutritional Benefits of Homemade Deli Meat
Unlike industrial cold cuts, which may contain unhealthy fats or excessive sodium, homemade deli meat offers:
-
High-Quality Protein: Meats like chicken, beef, or pork provide essential amino acids for muscle health and satiety.
-
Low Carbohydrates: Perfect for pairing with vegetables for a balanced meal.
-
Healthy Fats: Incorporate quality fats from ingredients like olive oil or bacon, avoiding the saturated fats in some processed meats.
-
No Additives: Skip nitrites, phosphates, and artificial flavors for a cleaner, nutrient-dense option.
-
Antioxidant Boost: Add spices like turmeric or rosemary for anti-inflammatory benefits.
Homemade deli meat is easy to make, customizable, and free from harmful additives found in store-bought cold cuts.
Recipe: Homemade Deli Meat
This versatile recipe combines minced beef or pork with chicken strips and customizable fillings. It’s simple to prepare, stores well, and is perfect for any occasion.
Ingredients (Serves 6–8)
-
500 g (1 lb) ground beef or pork (minced at the butcher shop for convenience)
-
300 g (10 oz) boneless, skinless chicken breast or thighs, cut into thin strips
-
100 g (3.5 oz) smoked bacon, chopped (optional)
-
1 teaspoon sea salt (adjust to taste)
-
1 teaspoon sweet paprika
-
1/2 teaspoon black pepper
-
1/2 teaspoon dried oregano
-
1/2 teaspoon garlic powder
-
1/2 teaspoon onion powder
-
Optional fillings: Diced carrots, asparagus, boiled egg, pickles, or fresh herbs
-
Optional spices: Turmeric, rosemary, or cumin for extra flavor
-
1 tablespoon olive oil (for moisture, optional)
Instructions
-
Prepare the Meat:
-
If using chicken, cut into thin strips or mince at home using a food processor for food safety (butcher shops typically avoid mincing poultry to prevent cross-contamination risks, like salmonella).
-
Important: Never wash raw chicken, and disinfect all surfaces and utensils after handling.
-
-
Mix the Base:
-
In a large bowl, combine the ground beef or pork with sea salt, paprika, black pepper, oregano, garlic powder, onion powder, and olive oil (if using). Mix thoroughly.
-
Add the chicken strips and smoked bacon (or other fillings) to the mixture, ensuring even distribution.
-
-
Shape the Deli Meat:
-
Line a loaf pan (9×5 inches) with parchment paper or lightly grease it.
-
Press the meat mixture firmly into the pan for a compact texture, or shape into a log and wrap tightly in parchment paper or foil for a rounder shape.
-
-
Cook:
-
Preheat the oven to 180°C (360°F).
-
Bake for 30–35 minutes, or until the internal temperature reaches 165°F (74°C) for chicken and 160°F (71°C) for beef/pork. Use a meat thermometer to confirm.
-
Alternatively, steam for a softer texture or use a sous-vide setup for precise cooking.
-
-
Cool and Slice:
-
Let the deli meat cool completely (about 1 hour) to firm up for easier slicing.
-
Slice thinly with a sharp knife or deli slicer for sandwich-ready portions.
-
-
Store:
-
Refrigerate in an airtight container for 4–5 days.
-
Freeze in portions, wrapped tightly, for up to 3 months.
-
High in protein and low in carbs, it’s perfect for summer tapas, salads, or kid-friendly snacks.

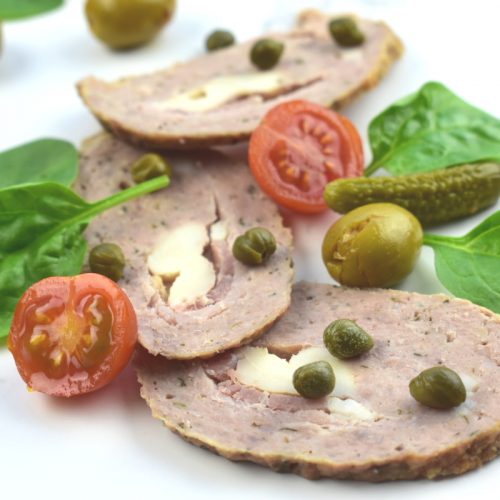
Serving Suggestions
-
Tapas Board: Serve thinly sliced with cheeses, olives, nuts, and gazpacho for a summer spread.
-
Salads: Pair with a tomato, mozzarella, and pesto salad or mixed greens.
-
Wraps: Roll in lettuce with avocado, capers, and a mustard or tzatziki sauce.
-
Sandwiches: Use whole-grain bread with pickles and greens for a hearty lunch.
-
Kids’ Snacks: Serve with veggie sticks for a protein-packed, kid-friendly meal.
Creative Filling and Spice Ideas
Experiment with these combinations to keep your deli meat exciting:
-
Mediterranean: Add olives, sun-dried tomatoes, and rosemary.
-
Spicy Kick: Use chili powder, jalapeños, or cayenne pepper.
-
Veggie-Packed: Include diced carrots, asparagus, or spinach.
-
Classic: Combine boiled egg and pickles for a traditional flavor.
-
Herb-Infused: Try fresh parsley, thyme, or dill for a vibrant twist.
Prepare in advance, refrigerate for 4–5 days, or freeze for up to 3 months for convenient, healthy meals.
Food Safety Tips
-
Mince Chicken at Home: Due to salmonella risks, butcher shops typically don’t mince poultry. Use a clean food processor and disinfect thoroughly afterward.
-
Cook Thoroughly: Ensure the internal temperature reaches the safe minimum for each meat type.
-
Avoid Cross-Contamination: Store raw meats separately and clean all surfaces after preparation.
Benefits of Homemade Deli Meat
-
Customizable: Tailor flavors and fillings to your preferences.
-
Meal Prep Friendly: Prepare in advance for quick, healthy meals.
-
Family-Oriented: Perfect for kids’ lunches or family gatherings.
-
Cost-Effective: Save money compared to premium deli meats.
-
Healthier: Avoid additives, control sodium, and use quality ingredients.
Related Posts
Making homemade deli meat is a simple, rewarding way to enjoy delicious, healthy cold cuts without the additives and fillers found in store-bought versions. With endless flavor combinations, easy preparation, and excellent storage options, this recipe is perfect for meal prep, summer tapas, or family meals.
Take control of your nutrition and impress your loved ones with this versatile, protein-packed dish.
Try it today and discover the joy of wholesome, homemade food!
FIAMBRE CASERO
Prepara un fiambre casero en casa y controla los ingredientes, puedes hacer combinaciones diferentes variando el relleno.
Ingredients
- 500 g carne de ternera y cerdo picada
- 100 g panceta ahumada unas 3 o 4 lonchas
- 100 g pechuga de pollo en tiras
- 1 cdita orégano
- 1 cdita tomillo
- 1 cdita ajo en polvo
- 1 pizca pimienta blanca molida
- 1 pizca sal marina
Instructions
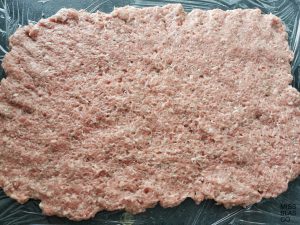
- Pon la carne picada en un bol, añade las especias y sazona, mezcla muy bien.
- Deja reposar la carne un ratito en la nevera, unos 10 minutos, es para que coja más consistencia y sea más fácil hacer el rollo.
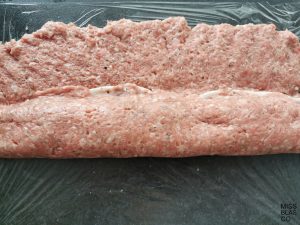
- Extiende la carne sobre un papel film formando un rectángulo, aplasta con las manos.
- Pon las lonchas de panceta en el centro del rectángulo.
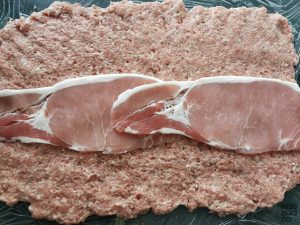
- Ahora las tiras de pollo, añade un poquito de sal y pimienta.
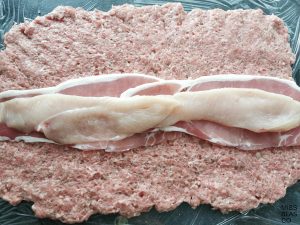
- Con la ayuda del papel film enrolla la carne, trata de que quede uniforme por todos los lados y bien firme.
- Retira el papel film y pon el rollo sobre una bandeja forrada con papel de horno para que no se pegue.
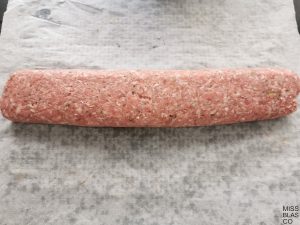
- Hornea a 180ºC durante 30-35 minutos, es importante que el horno está pre-calentado.
- Deja enfriar a temperatura ambiente y después en el frigorífico. Guárdalo siempre tapado para evitar que se reseque por fuera.
- Una vez frío y reposado córtalo en finas lonchas y sírvelo como tapa para el aperitivo, úsalo para preparar tostas, en sandwiches o en un wrap de lechuga. También puedes preparar una tabla con fiambre casero y quesos, hay muchas posibilidades.

Nutrition Facts
FIAMBRE CASERO
Amount Per Serving (125 g)
Calories 302
Calories from Fat 216
% Daily Value*
Fat 24g37%
Saturated Fat 9g56%
Trans Fat 1g
Polyunsaturated Fat 2g
Monounsaturated Fat 10g
Cholesterol 81mg27%
Sodium 250mg11%
Potassium 327mg9%
Carbohydrates 1g0%
Fiber 1g4%
Sugar 1g1%
Protein 20g40%
Vitamin A 23IU0%
Vitamin C 1mg1%
Calcium 21mg2%
Iron 2mg11%
* Los porcentajes de Valores Diarios están basados en una dieta de 2000 calorías.
Tried this recipe?Let us know how it was!
FIAMBRE CASERO, KETO, LOW CARB, RECETA, SIN AZÚCAR, SIN GLUTEN, SIN HARINA, SIN LACTOSA
ACEITUNASLÓPEZ
Nos encanta que incluyáis las aceitunas como ingredientes principales para este tipo de recetas. Sin duda, este ingrediente aporta un gran sabor, y hace que las recetas sean mucho más completas. Por suerte, existen un montón de aceitunas diferentes para que puedas explorar nuevos sabores.
missblasco
Hola!, las aceitunas me encantan, las partidas y aliñadas, las arbequinas, las kalamata, las clásicas manzanilla, para mi lo más importante es que estén elaboradas de manera tradicional, si es posible sin aditivos y por supuesto sin glutamato. Muchas gracias por tu comentario y la valoración y que vivan las aceitunas!!! 😉